
All American Autoclave Sterilizers
All American Autoclave Sterilizers are built for dependable steam sterilization in professional and controlled environments, including medical, dental, veterinary, laboratory, and field-use settings. Available in electric benchtop and stovetop models, these sterilizers are known for durable cast aluminum construction and a precision metal-to-metal seal.
Portable Steam Sterilization — Built for Reliability
Made in the USA. Gasket-Free Seal. Trusted in Clinics & Labs.
What Is an Autoclave Sterilizer?
An autoclave sterilizer is a sealed pressure chamber that uses high‑temperature steam to eliminate bacteria, viruses, fungi, and resistant microorganisms from reusable instruments and equipment. Steam sterilization is widely recognized as one of the most reliable methods used in medical, dental, laboratory, veterinary, and professional environments.
How Portable Autoclaves Work
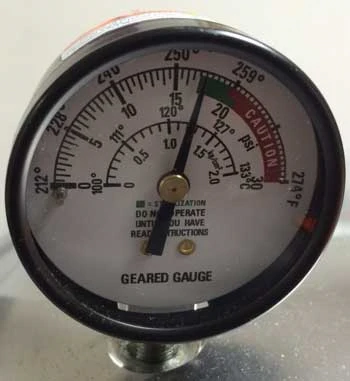
All American Portable Autoclave Sterilizers heat distilled water inside a locked pressure chamber to generate dry, pressurized steam ranging between 250°F and 259°F (121°C–127°C). This allows steam to circulate fully around instruments for consistent sterilization performance.
Trusted Design
Manufactured in the USA from hand‑cast aluminum with a precision metal‑to‑metal sealing system eliminating replaceable rubber gaskets for long‑term reliability.
Professional Steam Sterilization You Can Depend On
Steam sterilization remains one of the most widely used instrument preparation methods across healthcare, laboratory, and professional environments. Portable autoclave sterilizers allow organizations to maintain consistent sterilization procedures without large institutional equipment.Used in Professional Settings:
Medical • Dental • Veterinary • Laboratory
Mechanical Monitoring:
Pressure & Temperature Verification
Serviceable Design:
Long‑Term Parts Support Available
How to Choose Between Electric and Stovetop Sterilizers
Electric benchtop sterilizers are convenient when a dedicated electrical setup is preferred, while stovetop sterilizers are useful where portability, simplicity, or non-electric operation is important. Both styles require proper operation, maintenance, and attention to the manufacturer’s instructions.
Electric Benchtop Models – Ideal for permanent workstations requiring convenient countertop operation.Stovetop Models – Suitable for portable use or locations without dedicated electrical supply.
Larger Capacities – Recommended for higher instrument volume.
Compact Models – Ideal for smaller practices.
Choose Your Sterilizer Type
Select Electric Benchtop for convenient countertop operation, or Stovetop models for portable non-electric use.
Manufacturer Warranty Included
All products sold by Red Hill General Store, Authorized All American Retailer since 1998
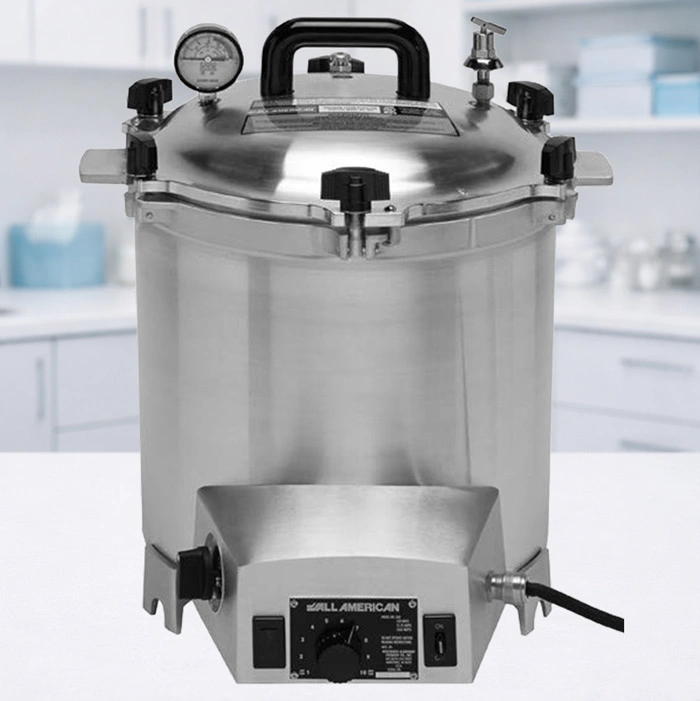
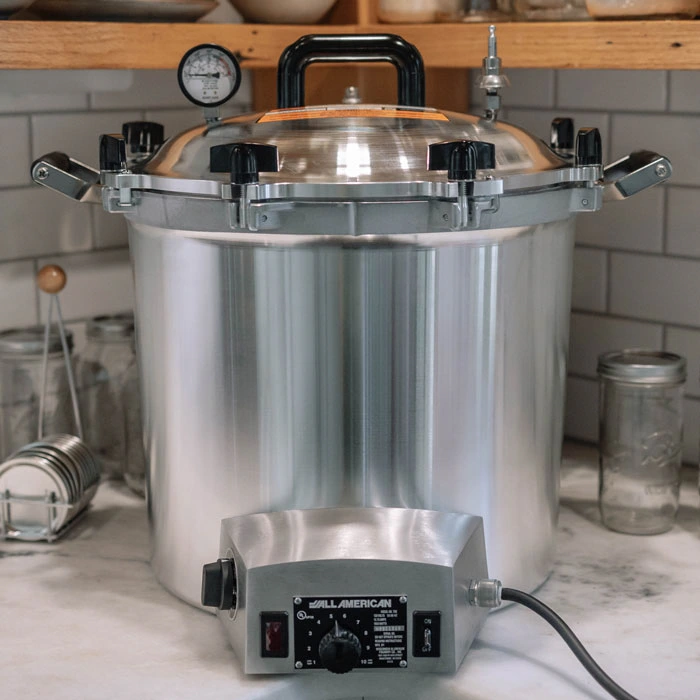
Electric Benchtop Autoclave Sterilizers
Available in 2 sizes — 14.5 qt and 27.3 qt inner container capacity. Designed for simple bench-top sterilization in offices, clinics, and labs.
Shop Electric Models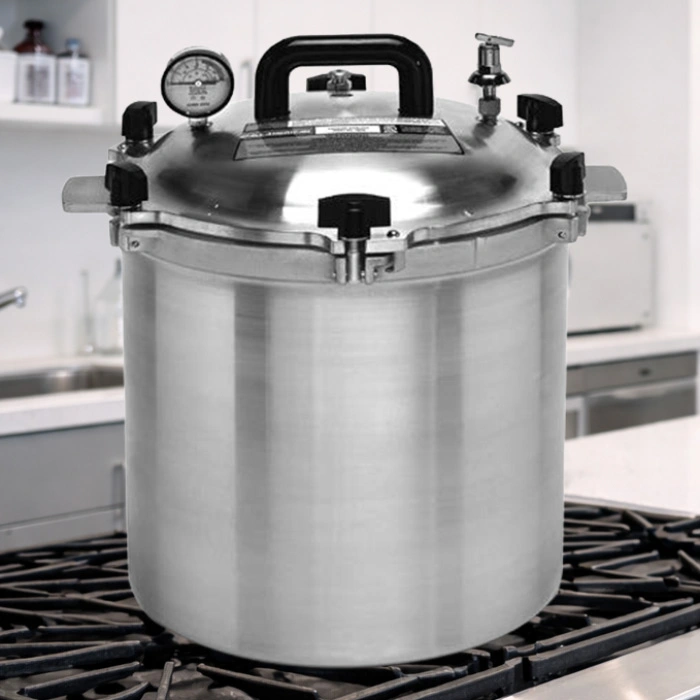
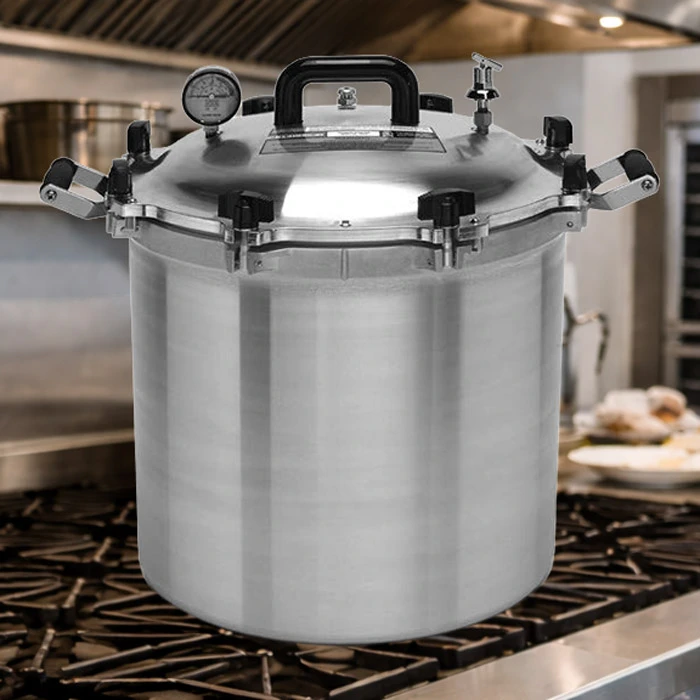
Stovetop Autoclave Sterilizers
Available in 2 sizes — 17.6 qt, and 27.9 qt inner container capacity. Great for portable, non-electric sterilization setups.
Shop Stovetop Models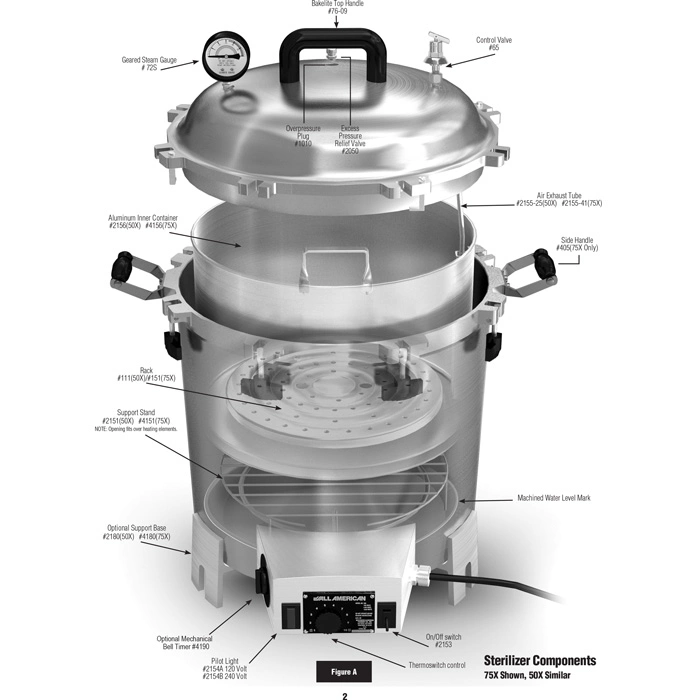
Sterilizer Maintenance Guide
Cleaning, inspection, troubleshooting, and replacement part guidance for All American portable autoclaves.
View Guide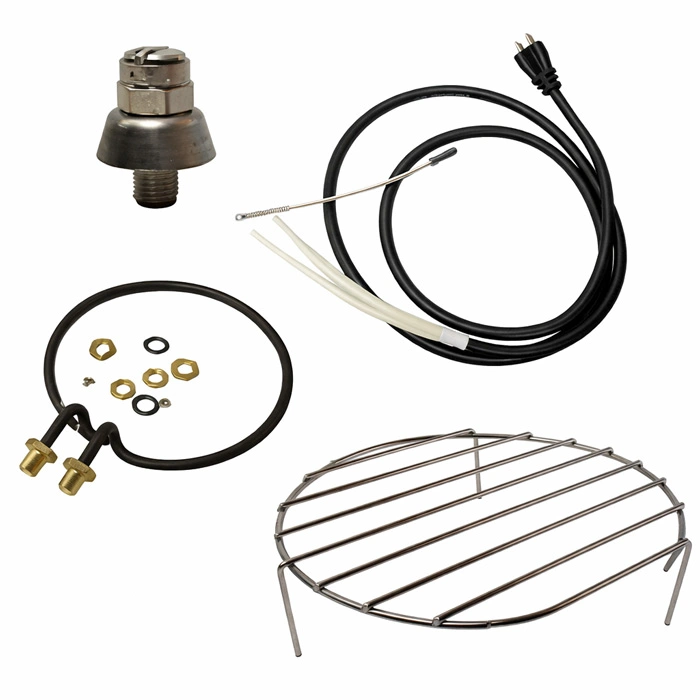
All American Sterilizer Parts
Full line of genuine replacement parts to help keep your sterilizer operating safely and efficiently.
Shop Sterilizer Parts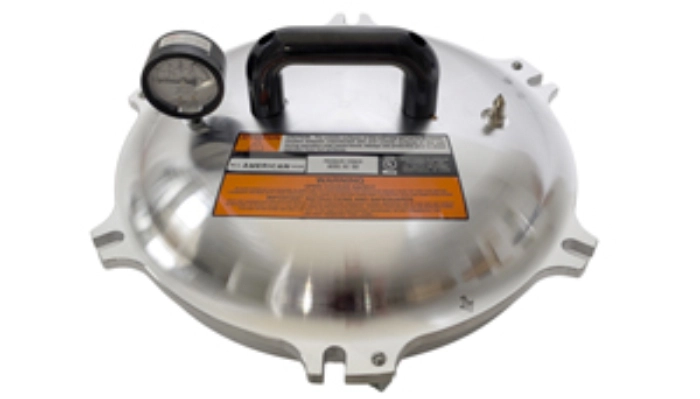
All American Sterilizer Replacement Covers
No Parts and With Parts Genuine Replacement Covers.
Shop Covers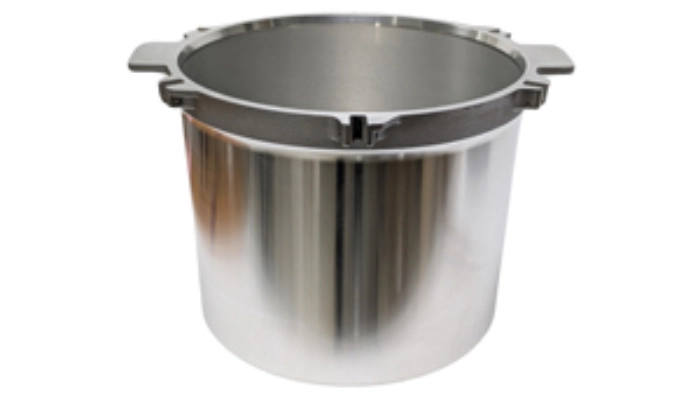
All American Sterilizer Replacement Bottoms
No Parts and With Parts Genuine Replacement Bottoms.
Shop BottomsThings to Know Before You Purchase Your New All American Sterilizer
Returned sterilizers must be in new unused condition, will be charged a 20% restocking fee and shipping cost is non-refundable.
Sterilizers cannot be shipped to Canada or Europe as we do not have the CSA certification.
*All American Non Electric Sterilizers are NOT recommended for use on glass top/flat ranges because of their weight may cause the glass/ceramic to break.
The diameter of the sterilizers are larger than most burners and may cause heat to transfer outward and damage the surrounding surface.
Attention Buyers: These items are sterilizers, not canners. They are not suitable for use as canners.
**Sterilizer period begins when the pressure steam gauge needle register in the green sterilization band shown of the face of the gauge and a minimum of 17psi has been reached.
The time required before this period for the sterilizer to heat will vary depending on the size of the sterilizer and the temperature of the water used.
Consult our Sterilizer Maintenance Guide for suggested Maintenance, Cleaning, Parts Replacement Intervals and Common Problems
Sterilizer / Autoclave Knowledgebase
What is an autoclave?
An autoclave, or sterilizer, is a pressure chamber that uses steam as a method of sterilizing materials. Autoclaves are very commonly used in medical and dental offices, veterinary offices, beauty/nail salons, tattoo parlors and laboratories.
How does an autoclave work?
When items are placed in an autoclave, they are exposed to a high temperature steam for approximately 20 minutes. The temperature of the steam is around 270 degrees Fahrenheit. The hot steam results from water inside the chamber that is pressurized as it heats. The high temperature of the steam kills germs, spores and bacteria that washing with soap or detergents can’t.
How to clean your sterilizer
Your sterilizer should be cleaned after each use. Rinse thoroughly with water and fill the sterilizer to the standard operating level with white vinegar. Let stand for several minutes. Rinse thoroughly with water after the vinegar bath. Repeat the vinegar process a couple of times to fully remove any lime and mineral deposits which can lead to calcification. Dry the sterilizer well before storing. Your sterilizer should be stored in a clean, dry area. Be certain to remember to never turn your sterilizer “on” when filled with a cleaning solution.
Why can’t I use tap water in my sterilizer?
Tap water can cause damage to your sterilizer because of the variety of dissolved minerals and salts it contains. In certain areas, the mineral content in water can be very high. The minerals and salts can cause a buildup that can lead to decreased functionality of the sterilizer. For these reasons, it is necessary to use distilled water only in your sterilizer.
Autoclave / Sterilizer Safety Precautions
• Always wear heat resistant gloves when touching the sterilizer when it is in use and before it has cooled down.• Never use near combustible materials.
• Never places items containing corrosives in an autoclave/sterilizer. Doing so is a fire hazard.
• Wait for the pressure to reach zero before attempting to open the sterilizer. Once the pressure is zero, the chance for steam burns is reduced.
• Don’t pack items too closely inside the autoclave/sterilizer. Be sure to leave enough room between the items so that the steam can thoroughly pass around all the items to ensure effective sterilization.
• Be sure to follow the manufacturer’s recommendations for use of your sterilizer for optimal performance.
• Do not use the sterilizer for any purpose other than its intended use.
• Never run the unit without water. Doing so damages the heating element.
• Never use your sterilizer for cooking or processing food.
• Always be sure to check your pressure release devices for clogs before using.
• Never move the sterilizer while is is pressurized.
• Do not allow children or pets near the sterilizer.
Disadvantages of Autoclaves
• The heat generated during the sterilization process can melt certain plastics.• The pressure can cause dulling of sharp instruments.
• Can cause chemicals to break down during the sterilization process.
Optimal temperature and pressure for sterilization
Optimal temperature and pressure have been reached in the sterilizer when the gauge reads in the green “sterilization zone”. The temperature range in this zone is from 250 degrees Fahrenheit (121 degrees Celsius) to 259 degrees Fahrenheit (127 degrees Celsius). The pressure range in this zone is between 15 - 22 PSI (pounds per square inch). Pressure amounts will vary based on elevation and it is best to refer to an elevation chart for exact numbers.
| Altitude | Steam Pressure Required |
|---|---|
| Sea Level | 15-17 PSI |
| 2000 Feet | 16-18 PSI |
| 4000 Feet | 17-19 PSI |
| 6000 Feet | 18-20 PSI |
| 8000 Feet | 19-21 PSI |
| 10,000 Feet | 20-22 PSI |
Autoclave repair
Parts are available for purchase for your sterilizer here, however we suggest that the thermostat, thermoswitch, heating element and thermometer be repaired/replaced by the manufacturer, Wisconsin Aluminum Foundry. They can be reached at 1-920-686-2701 or email customerrelations@wafco.com.
How do I choose which sterilizer to purchase?
First, consider what types of items you will be sterilizing. The more items you will be loading into your sterilizer, the larger model of sterilizer you’ll need. Take into account where you will be using the autoclave and the amount of space that is available in that area. If you need help deciding which sterilizer is the right choice for you, our customer service team will be glad to help. You can reach customer service at 1-800-251-8824.
Why are there water marks on the inside of my new sterilizer?
Your new sterilizer will have light water marks on the inside of the unit because each All American Sterilizer is inspected and tested for accuracy and quality by the manufacturer.
How to Use Your All American Sterilizer
- Before you begin, place the sterilizer on a flat, heat tolerant surface near an electrical outlet (Electric). Or place sterilizer on heat source (Non-electric).
- Remove the cover of the sterilizer by turning the wing nuts in a counter-clockwise motion. Always undo two opposite wing nuts at a time.
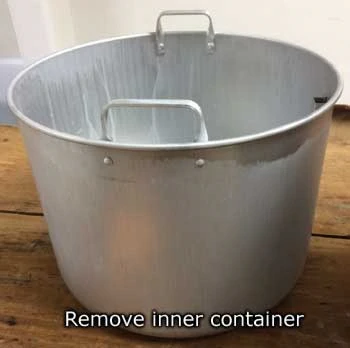
- Remove the inner container and inner container rack from inside the sterilizer.
- Apply a thin layer of lubricant, such as high vacuum grease or petroleum jelly, to the metal to metal seal.
- Fill the sterilizer to the water line in the bottom of the sterilizer with distilled water. The water must be directly over the heating element, NOT inside the inner container. Next, place the inner container rack inside the inner container with the lip side down.
- While the inner container is still outside of the sterilizer, place the items to be sterilized on the inner container rack. You may wish to place the items inside plastic bags designed for use inside steam sterilizers. Arrange the items so that steam may circulate freely inside the chamber during the sterilization cycle.
- Check to be sure you water level inside the sterilizer is correct and then place the loaded inner container inside the sterilizer.
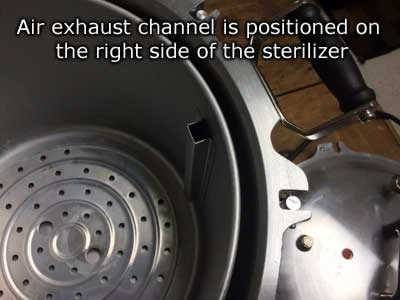
- VERY IMPORTANT- Make sure that the air exhaust channel (located on the inside of the inner container) is positioned on the right side of the sterilizer. This is necessary so that when the cover is placed on the unit, you can guide the air exhaust tube into the air exhaust tube channel.
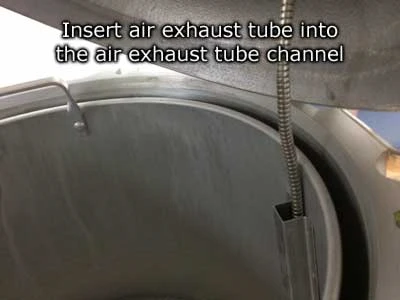
- Place the cover on the sterilizer. Make sure the index alignment arrow on the cover aligns with the index line arrow on the side of the bottom. Also, make sure the air exhaust tube is inserted into the air exhaust tube channel.
- Tighten the wing nuts to secure the cover in place. Always tighten two opposite wing nuts at one time to ensure the cover is on the sterilizer evenly. Never use a wrench or mechanical device to tighten the wing nuts.
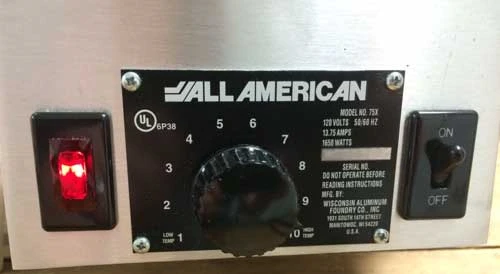
- Plug the power supply cord into the proper outlet - 120V or 240V. Next, turn the on/off toggle to the “on” position. The red pilot light should be illuminated (Electric). Or turn on outside heat source (Non-electric).
- Open the control valve by moving the lever to the upright position. It will take approximately 45 minutes to build pressure inside the sterilizer. This may vary based on the size of the sterilizer. Steam will be drawn from the bottom of the unit up through the air exhaust tube and out of the control valve. Steam must continually escape from the control valve for at least 5 minutes. Once this has occurred, close the valve and let the pressure build until the gauge reads in the “green” sterilization zone. Open the control valve a second time and vent the chamber an additional 3 to 5 minutes. The reason for the second venting is to avoid sterilizer failure from trapped air in the chamber, which may prevent the steam from permeating the items to be sterilized.
- Once the chamber is properly vented, the sterilization process begins. Start timing the sterilization cycle when the gauge is in the green zone. It is recommended to run a sterilization cycle of no less than 35 minutes at a temperature of no less than 250 degrees Fahrenheit (121 degrees Celsius). Use the timer on the left side of the unit (50x and 75x only). Be sure to monitor the gauge during the sterilization cycle.
- At the end of the sterilization cycle, turn the toggle switch to “off” (Electric) or outside heat source off (Non-electric) and open the control valve. The valve will be very hot. To avoid potential injury, always wear heat resistant gloves to open the valve. Continue monitoring the gauge until it reaches 0 PSI. Never attempt to open the sterilizer until the gauge reads zero.
- With the pressure gauge reading zero, loosen the wing nuts. The wing nuts may be hot, so be sure to wear your heat resistant gloves when loosening them. Remove the cover. Remember to tilt the cover away from yourself to prevent injury from any remaining steam.
- Remove the inner container. If the sterilizer is not going to be immediately used again, empty all of the water from the unit and thoroughly dry the inside of the unit. Leave the control valve open during storage to allow air to circulate through your sterilizer.
Autoclave Maintenance — Maintaining Your Sterilizer
• It is recommended to periodically check the metal-to-metal seal and lubricate as needed. It is very important to keep the seal lubricated because, without proper lubrication, the cover could stick and become very difficult to remove.• Be sure not to immerse your pressure gauge in water when cleaning the sterilizer. The gauge does not require any regular maintenance other than periodically checking the opening to make sure it is clear of any debris. Do not use your unit if the gauge face cracks, fills with steam or does not return to zero pressure.
• It is important to periodically clean the control valve in hot, soapy water. This helps to ensure a long life and proper operation for your unit. If distilled water is not used during sterilization, calcification can build up and cause the valve to leak. To clean any built up calcification, soak the valve in vinegar and then wash in hot, soapy water and dry thoroughly.
• The air exhaust tube needs to be frequently checked to ensure that air passes freely through it. It’s recommended that you blow air through the tube at least once a month to ensure that there is nothing blocking the tube. Simply remove the air exhaust tube from the control valve on the bottom of the sterilizer cover and blow through it. If you notice any difficulty cleaning the air exhaust tube of debris or notice any corrosion, it is best to discard the tube and replace it with a new one.
• It is recommended that the pressure relief valve be replaced every 3 years.
• It is recommended that the overpressure plug be replaced every 6 months.
See our Sterilizer Maintenance Guide for suggested Maintenance, Cleaning, Parts Replacement Intervals and Common Problems
All American Sterilizer Features
• Made in the U.S.A.• 1 year warranty
• Interior stainless steel support stand
• Optional support bases to elevate electric sterilizers to prevent heat damage to surfaces.
• Calrod immersion heating element.
• Units include aluminum inner container with rack
• 3 wire grounded cord and plug for safety
• Operational on 50Hz or 60Hz
Frequently Asked Questions
Not Sure Which Sterilizer Is Right for You?
Tell us what you’re sterilizing and how much capacity you need — we’ll help you choose the best model.
Call 1-800-251-8824
Educational information provided to assist customers in understanding sterilization equipment operation and selection. Always follow manufacturer operating instructions and applicable workplace regulations.
All of our products are first quality and factory new. If you are not satisfied with any AllAmericanCanner.Com product you may return it within 30 days for replacement or refund. AllAmericanCanner.com is independently owned and operated by Red Hill General Store, Inc. We are not affiliated with Wisconsin Aluminum Foundry other than being an authorized retailer of their products.